

Several watermarks moving at the same time used to mean marking every one of them by hand, frame after frame. There is a shortcut: box one of them, and Looep Video Repair works out that the others are the same watermark, follows each copy along its own path, and removes them all in a single pass.
This is a picture walkthrough of that feature – Multi-watermark motion path on the Moving watermark tab. Every screenshot below is the real program with a real clip loaded, and the red numbers match the notes under each picture.
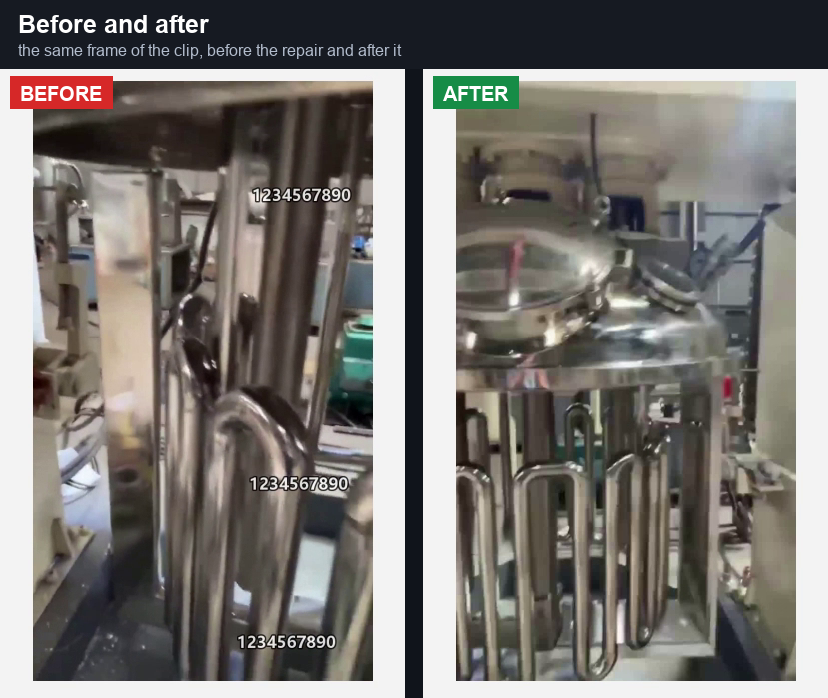
What you are doing, in one paragraph
You park the video on a clear frame, draw one box around one of the watermarks, tell the program how often to look, and confirm which text it should follow. It then walks the whole clip, finds every copy of that watermark, and sorts them into one track per watermark – even when all of them carry exactly the same text. The box you drew is the size template, and the text you confirmed is what tells the copies apart from everything else on screen. When the tracks look right, you run the repair and the background is rebuilt in every frame.
At a glance
- Tab: Moving watermark
- Feature: Multi-watermark motion path
- You box: one watermark (not three)
- Typical settings: interval 0.5 s (Per second), split / jump threshold 0.15, compensation Moving, lead and delay 0.5 s
Step 1 – Load the video and pause on a clear frame
Open the file with Open video, press Play, slow it down with the speed box if you need to, and pause where the whole watermark is sharp and fully visible. Everything after this is based on the frame you are looking at now.
If the frame is blurry or the watermark is half off-screen, move a little and try again – this single choice matters more than any setting.
Step 2 – Choose the processing method
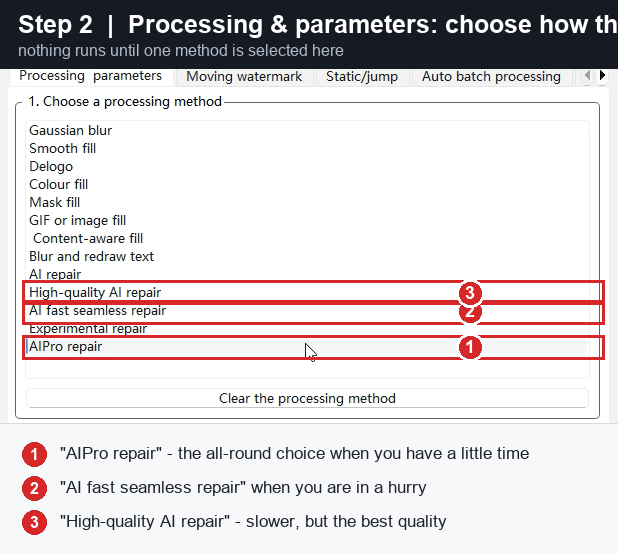
On the Processing & parameters tab, nothing can run until one method is selected here.
- "AIPro repair" – the all-round choice for moving watermarks; the background is rebuilt, not blurred.
- "AI fast seamless repair" – when you are in a hurry.
- "High-quality AI repair" – slower, but the best quality.
Step 3 – Moving watermark tab: click "Multi-watermark motion path"
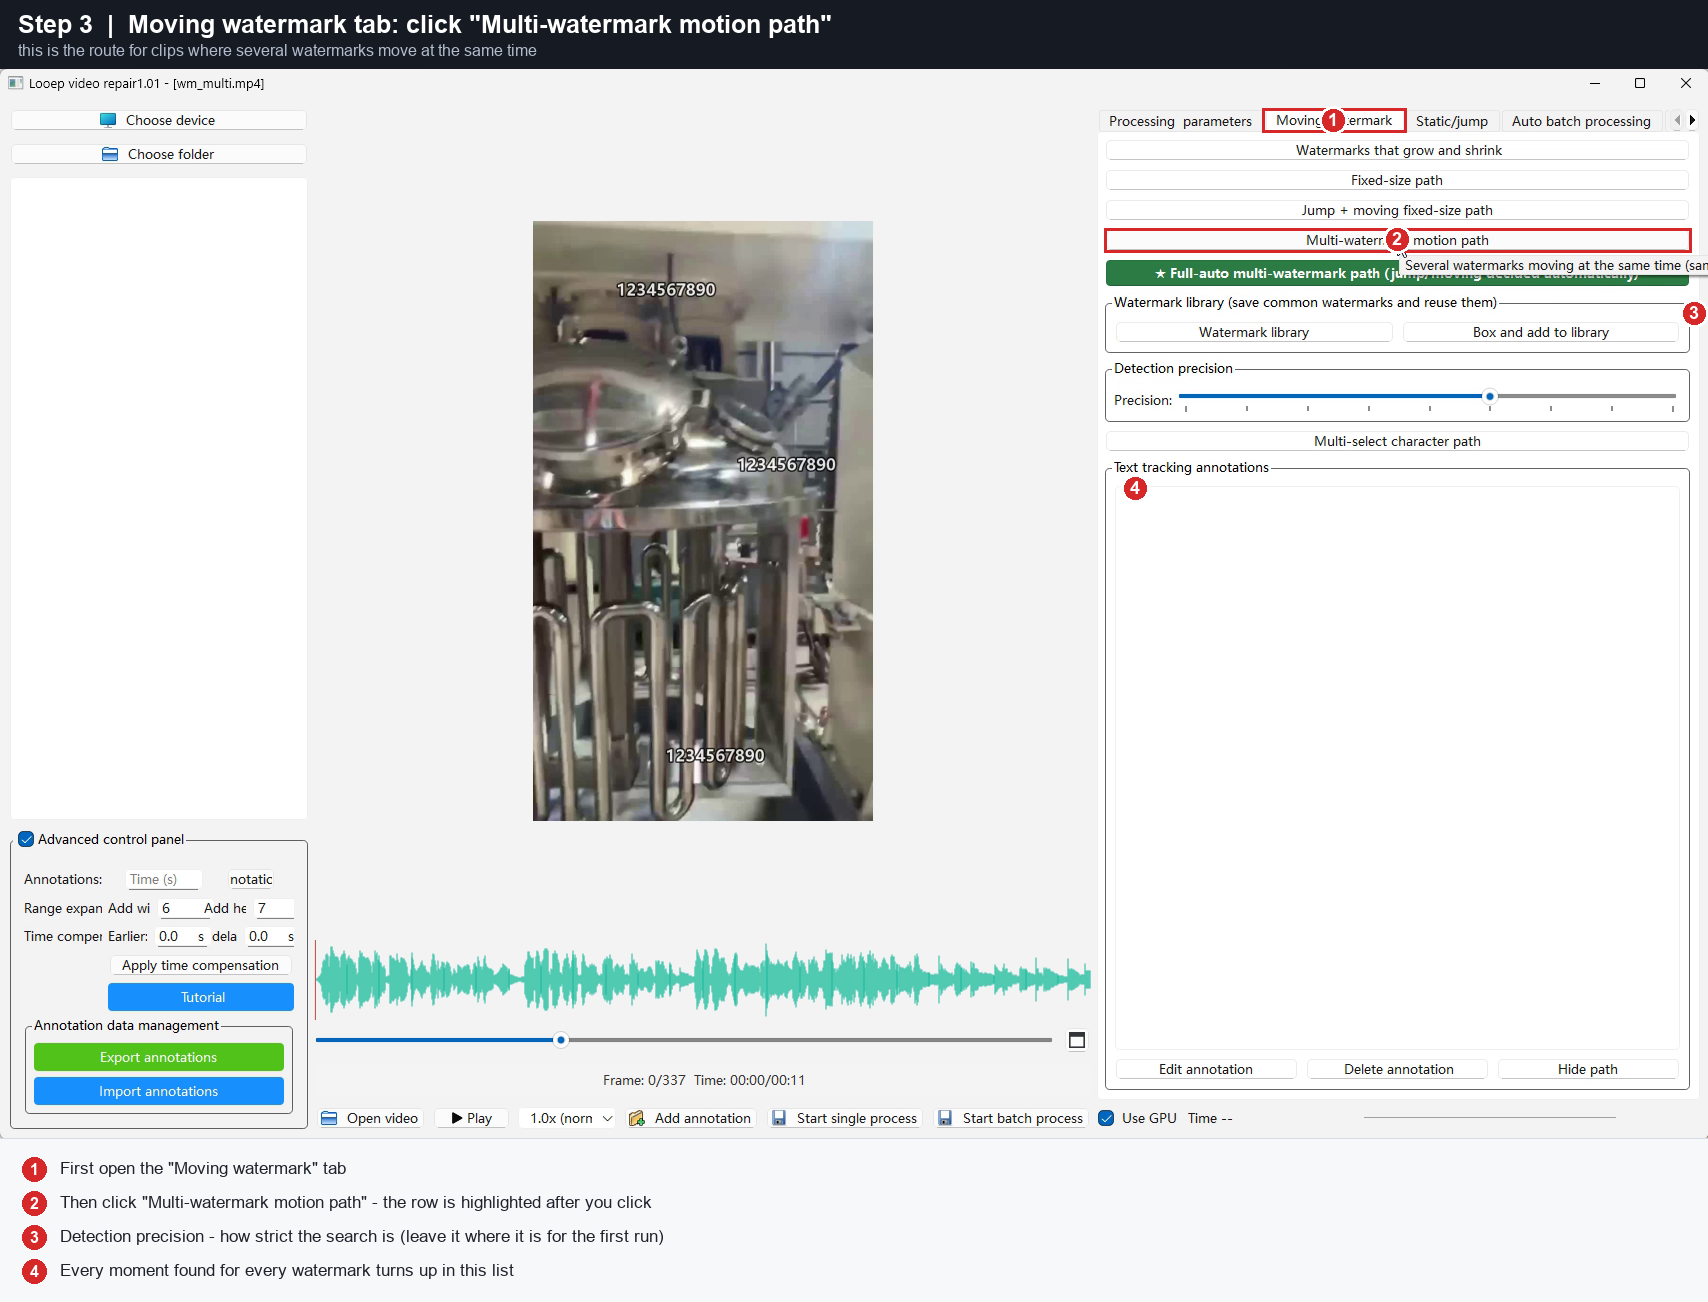
- First open the "Moving watermark" tab.
- Then click "Multi-watermark motion path" – the row is highlighted after you click.
- Detection precision decides how strict the search is. Leave it where it is for your first run; lower it later only if a watermark is missed.
- Every moment that was found for every watermark turns up in this list.
The green row underneath (Full-auto multi-watermark path) does the same job without drawing a box, but it needs your watermark to be saved in the library first.
Step 4 – Read the short reminder, then click OK
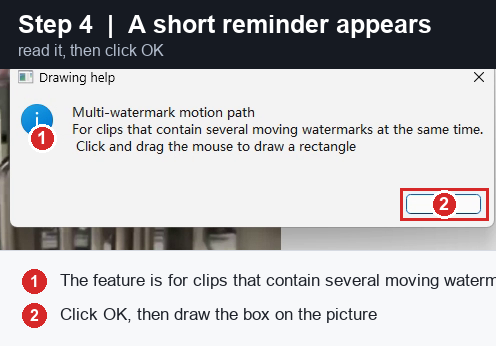
- It tells you what the feature is for: clips that contain several moving watermarks at the same time.
- Click OK, then draw the box on the picture with the mouse.
Step 5 – Drag a box around ONE of the watermarks
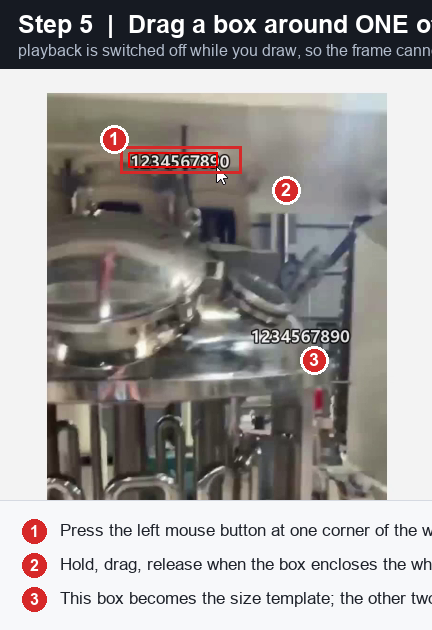
- Press the left mouse button at one corner of the watermark.
- Hold, drag, release when the box encloses the whole watermark – a little air on every side. Slightly too big is much better than slightly too small.
- That box becomes the size template. The other two copies are found automatically – you do not draw them.
While you are drawing, playback is switched off so the frame cannot move under you.
Step 6 – Choose how often it should look
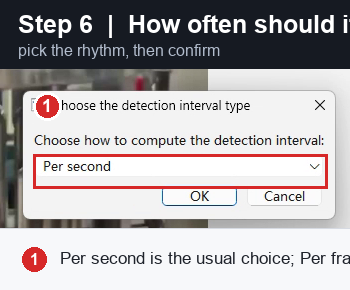
- Per second is the usual choice. Per frame is for a watermark that moves quickly, and Check every frame is the most thorough and the slowest.
Step 7 – Set the detection interval value
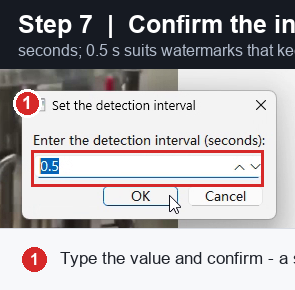
- Type the value and confirm. 0.5 s suits watermarks that keep moving: the more often it looks, the more likely it is to catch a watermark mid-jump. A smaller number finds more, but takes longer.
Step 8 – The settings that decide how the tracks are split
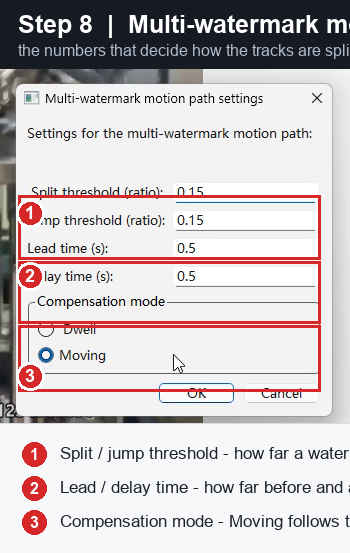
- Split / jump threshold (0.15) – how far a watermark may move between two checks and still count as the same track. If two different watermarks get mixed into one track, lower this. If one watermark is split into two tracks, raise it.
- Lead / delay time (0.5 s each) – how far before and after each detection the area is cleaned, so the watermark does not flash at the edges of the track.
- Compensation mode – choose Moving, because the watermarks keep travelling. Dwell is for watermarks that stay put.
Step 9 – Confirm the text to follow
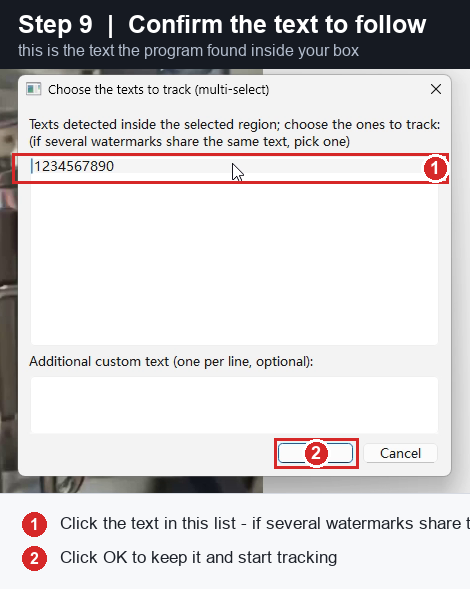
- This is the text the program found inside the box you drew. Click it in the list and click OK.
- If several watermarks share the same text – which is exactly the case in the clip used here – one entry is enough; every copy of it is tracked separately.
- If the list is empty, the box missed the text: go back to Step 5 and draw it again a little larger.
Step 10 – Check the moments it found, then let it start
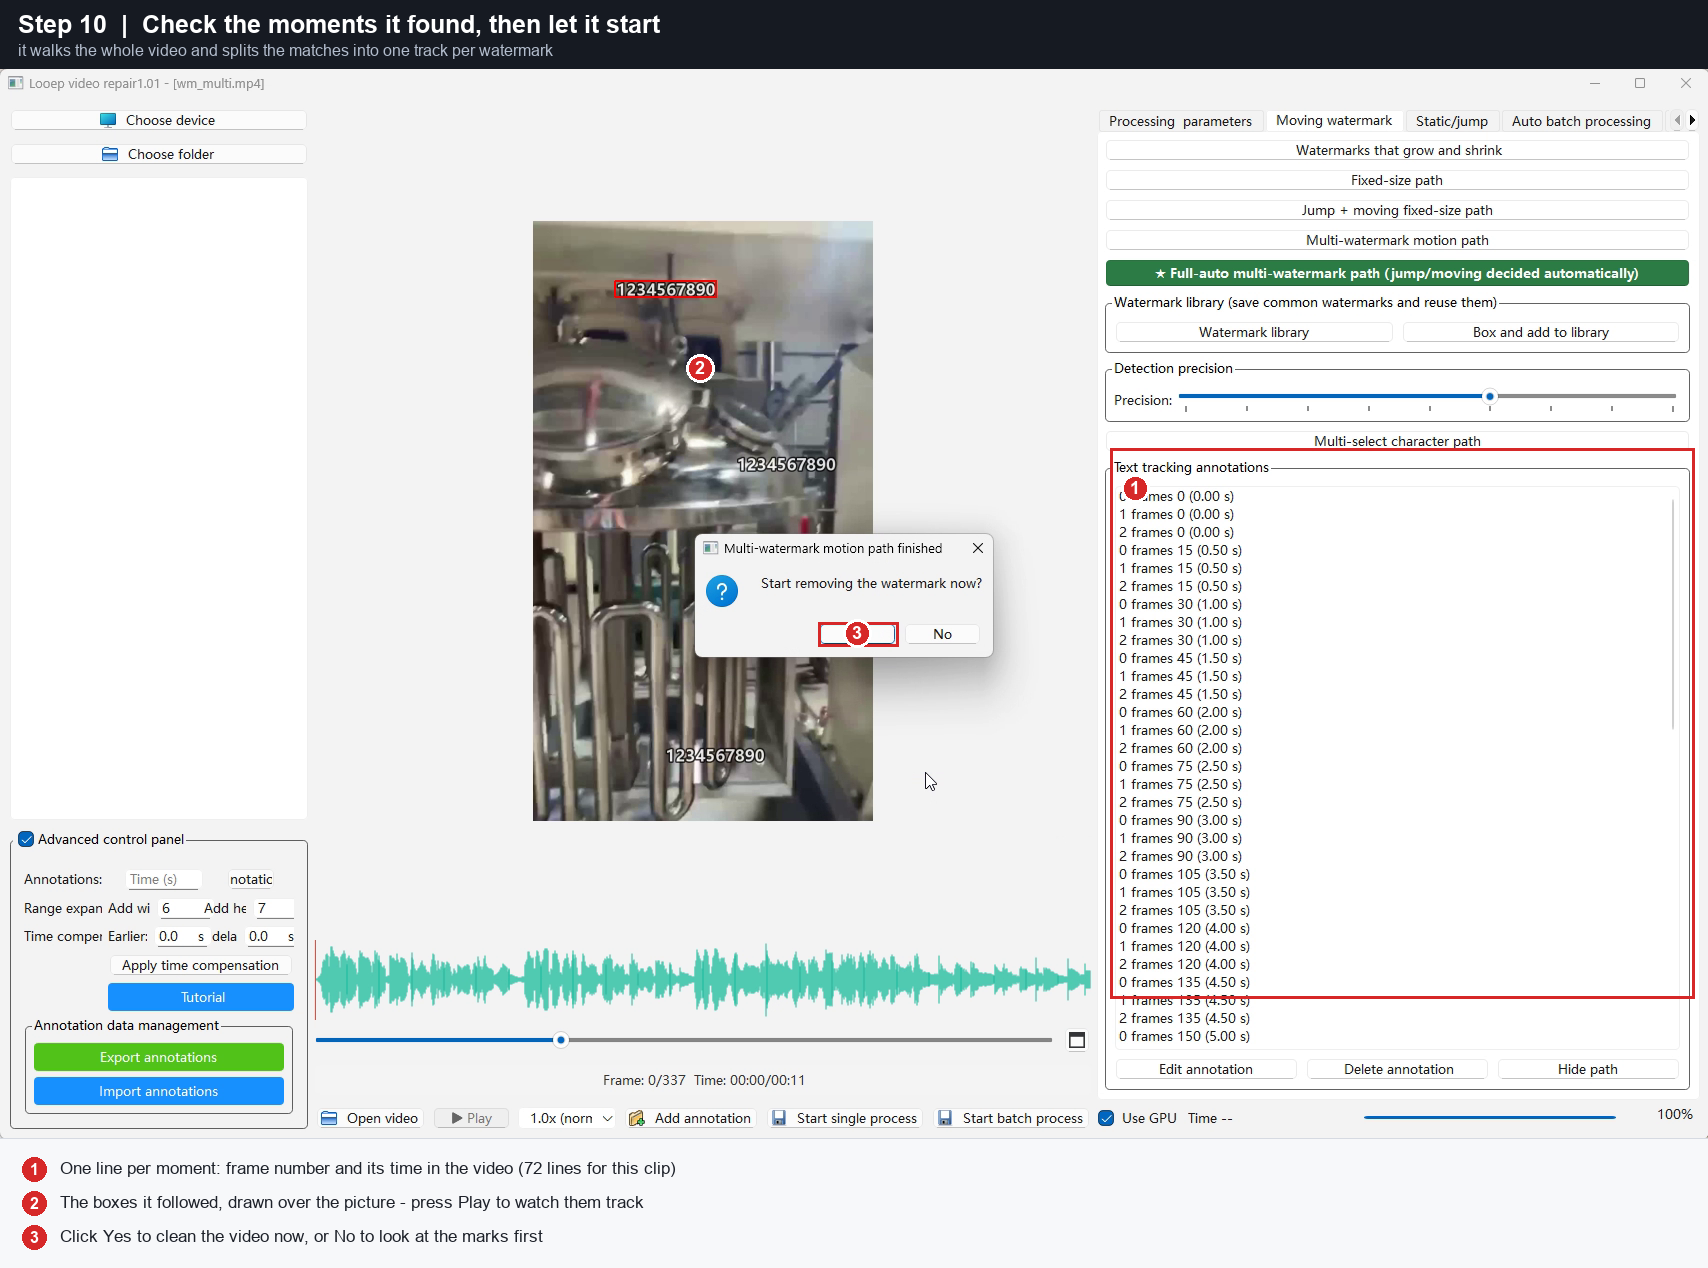
- One line per moment, with the frame number and its time in the video. In this clip the search found 72 moments, and they were automatically grouped into three tracks – one per watermark. Scroll the list to see how far through the video it got.
- The boxes it followed are drawn over the picture. Press Play to watch them track the watermark; if a moment is wrong, use Edit annotation / Delete annotation, or Hide path to hide the boxes and see the real picture.
- It then asks one question: click Yes to clean the video now, or No if you want to look at the marks first. Your marks are kept either way.
Step 11 – The result
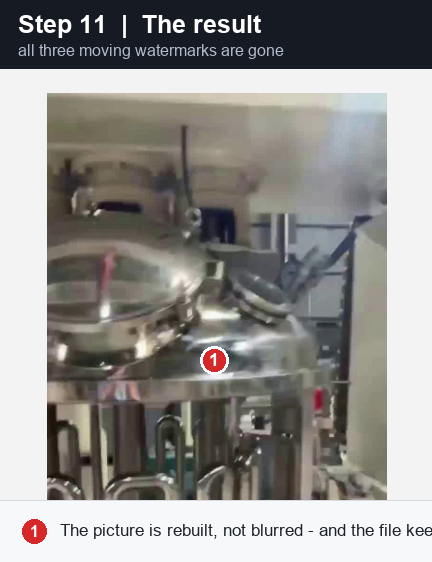
All three watermarks are gone, the picture is rebuilt instead of blurred, and the finished file keeps the original name plus the method.
Step 12 – Run it on one clip or a whole folder

- Start single process cleans the video that is open.
- Start batch process runs a whole folder of clips – useful when a series of videos carries the same watermarks.
- Tick Use GPU when your computer has one; the job finishes sooner.
Quick recap
- Load the video, pause on a clear frame.
- Pick a method on Processing & parameters – AIPro repair is the usual choice.
- Moving watermark tab -> Multi-watermark motion path.
- Draw a box around one watermark.
- Detection interval: Per second, 0.5 s.
- Keep the split / jump threshold at 0.15 and set compensation to Moving, lead and delay 0.5 s.
- Confirm the text to follow.
- Check the tracks, click Yes.
- Tick Use GPU and press Start single process.
Settings used in this example
| Setting | Value | What it does |
|---|---|---|
| Processing method | AIPro repair | Rebuilds the background instead of blurring it |
| Tab | Moving watermark | Watermarks that travel around the picture |
| Feature | Multi-watermark motion path | One box, every copy tracked separately |
| Detection interval | 0.5 s (Per second) | How often the frame is checked |
| Split / jump threshold | 0.15 | How far a watermark may move between checks and still be the same track |
| Compensation mode | Moving | Follows the watermark while it travels |
| Lead / delay time | 0.5 s / 0.5 s | Cleans a little before and after each detection |
| Detected | 72 moments -> 3 tracks | All three watermarks removed in one pass |
When to use this feature
- Multi-watermark motion path – several watermarks move at the same time, whether or not they carry the same text. This is the guide you are reading.
- Fixed-size path – a single watermark that slides around but keeps the same size. See Fixed-size path – Illustrated Step-by-Step Guide.
- Watermarks that grow and shrink – the watermark changes size while it moves.
- Static / jump – the watermark stays in one place or jumps between fixed spots; this is also the tab used for removing burned-in subtitles.
If you only want the three-minute overview of this workflow, watch Remove Moving Watermarks in 3 Minutes.
Frequently asked questions
Can it remove several moving watermarks that all show exactly the same text? Yes. That is the point of this feature. The program finds every match of the text you confirm and then splits the matches into separate tracks by position, so each watermark is followed on its own path.
What if two watermarks get merged into one track? Lower the split / jump threshold a little and run the detection again. If instead one watermark is broken into two tracks, raise it.
What if a moment in the middle of the video is missing? Park the playhead there, click Add annotation in the bottom toolbar and draw the box yourself. To widen every box a little, use Add width / Add height in the Advanced control panel and run again.
Does it work on a moving logo or a watermark that changes size? Use Watermarks that grow and shrink for a watermark that changes size, and the box-and-track route on the same tab for a moving logo. Both are described in the user guide.
Is the video uploaded anywhere? No. Everything runs locally on your own machine, on your own GPU. Nothing is uploaded.
Where to get it
Looep Video Repair runs on Windows. Download it and read the full documentation here:
https://www.looep.com/looep-video-repair
The other buttons on the same tab work in the same way: box the watermark (or pick it from the library), choose the interval, check the marks, then run. Only the first click changes.
